
[et_pb_section admin_label=”Section” fullwidth=”off” specialty=”on” transparent_background=”off” background_color=”#ffffff” allow_player_pause=”off” inner_shadow=”off” parallax=”off” parallax_method=”off” padding_mobile=”off” make_fullwidth=”on” use_custom_width=”off” width_unit=”on” make_equal=”off” use_custom_gutter=”off” parallax_1=”off” parallax_method_1=”off” parallax_2=”off” parallax_method_2=”off”][et_pb_column type=”1_4″][et_pb_sidebar admin_label=”Sidebar” orientation=”left” area=”sidebar-1″ background_layout=”light” remove_border=”off”]
[/et_pb_sidebar][/et_pb_column][et_pb_column type=”3_4″ specialty_columns=”3″][et_pb_row_inner admin_label=”Row”][et_pb_column_inner type=”4_4″ saved_specialty_column_type=”3_4″][et_pb_text admin_label=”Text” background_layout=”light” text_orientation=”left” use_border_color=”off” border_color=”#ffffff” border_style=”solid” custom_css_main_element=”h3{||padding-top: 20px; ||padding-bottom: 20px;||}||||.inline{||display: inline-block;||}”]
Kabuto
Purpose
Kabuto is a light-weight tool designed to bring recurring business back to your repair shop. Installing Kabuto on a device allows you and the device owner to be notified of issues, and facilitates communication to get the device repaired as quickly as possible.
Core functionality:
- Detect issues on the device such as:
- Hard Drive Failures
- Application Crashes
- Blue Screens of Death
- Low Disk Space
- Fragmented Drives
- No A/V Installed
- Disabled Firewall
- Device Manager Issues
- Time-Based Triggers
- Notify both the device owner and technician of issues with the machine
- Monitoring and Manage client’s antivirus installation
Adding a Device
- Create an account via app.kabuto.io and login to your Kabuto Dashboard.
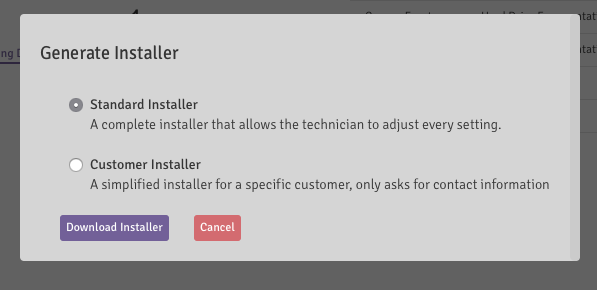
- Click the “Download Installer” button in the top right corner of the Kabuto Dashboard and select Standard Installer.
- Run the Kabuto Installer with administrative privileges. Select the appropriate Customer and add in the device owner’s contact information.Note: It’s advisable to create the Customer on the Kabuto dashboard ahead of time to make adding customers easier.

- Adjust the triggers the Kabuto client will track on the device. By default all triggers are activated. Monitoring is turned off by default; when turned on, it will notify the technician to detected issues. If left off, when the customer sees an alert from Kabuto, they will be presented with a readable alert description along with guidance on how to best contact the technician.

- After this point, the Kabuto client will be installed and will send initial scan results to the Dashboard. A corresponding device entry should now be visible on the Devices page showing the current status of all triggers.
What the Device Owner Sees Once Kabuto is Installed
After the Kabuto client has been installed on a device, it will monitor for issues and alert the customer if any issues are detected. The alert will look similar to the one pictured below.

When the device owner recognizes the issue and left clicks “Request Service,” they are presented with the Request Form seen below. This expanded form will allow them to review their contact information and send you a request for service.

Simulating an Alert
To simulate an alert, open a command-prompt, and type the following command:
"C:\Program Files\RepairTech\Kabuto\Kabuto.App.Runner.exe" --demo
Note: Depending on your OS, you may need to use “Program Files (x86)” instead of “Program Files”
Installer Command-line Flags
You can use the following command-line parameters with the Installer:
--customerid - The ID of the customer. This parameter is required if you're using the Standard Installer. To find this go to any customer in the online dashboard, and look at the URL. The picture below should help illustrate this:
-n, --name - The Device Name
-e, --email - The Device Email
-p, --phone - The Device Phone
-i, --install_path - The installation path for the Kabuto.exe. Default: Program Files\
-t, --triggers - Activating all triggers will can be done by adding -t To activate specific triggers, see "Specifying Triggers" below. All triggers are turned off by default.
-m, --monitoring - True or False for the client's machine
-h, --help - Show help text window for the available command-line flags
-console [true/false] - Runs Kabuto Installer silently
Specifying Triggers
To specify triggers to be turned on via command-line, utilize the -t or –triggers flags and follow with any of the following:
no_av - Activates a trigger for no installed Antivirus
defrag - Activates a trigger for a suggested defragmentation
app_crash - Activates a trigger for app crash reports
firewall - Activates a trigger for a deactivated firewall
low_hd_space - Activates a trigger for low disk space
device_manager - Activates a trigger for improperly installed device
bsod - Activates a trigger for "blue screen of death" mini dumps
smart_failure - Activates a trigger for a failed HDD smart test
time - Activates a trigger for a timed message to appear to the client
As an example, to turn on the AV, defray and firewall triggers, we would execute the following command:
KabutoSetup.exe --customerid 12345 -t no_av, defrag, app_crash
The above example is missing other standard setup parameters such as key, name, email, phone, comp name, etc. A full setup command with the same triggers might look more like this.
KabutoSetup.exe --customerid 12345 -n "Samwise Alt" -e "salt@repairtech.com" -p "123456789" -c "RepairTech" -t no_av, defrag, app_crash -i "C:\Program Files (x86)\Kabuto"
Standard Installer
The Kabuto Standard Installer gives you a great way fully set up a new Device you’re working on. The interface gives you full control of each of the settings for a device. To download, head to your Dashboard, click “Download installer” and select Standard Installer. Note: This is designed for technician use only and it is advised that this isn’t distributed to customers.
Customer Installer
The Kabuto Customer Installer gives you a great way to distribute Kabuto to your customers. The interface is simple, specific to an existing customer and user-friendly.
To use the installer and distribute it to your customers, navigate to your dashboard, click “Download Installer”, select “Customer Installer” and select the appropriate customer.
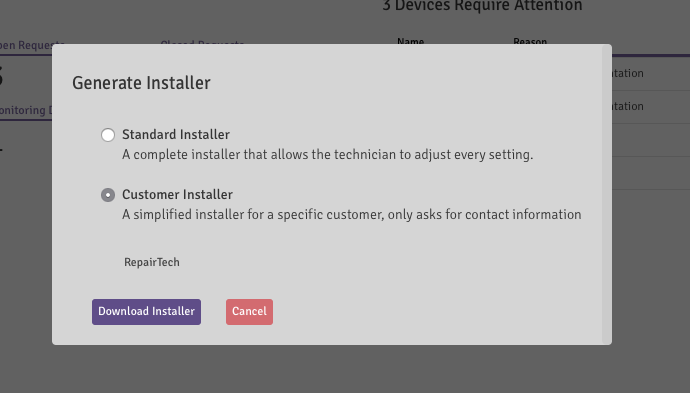
When they use the installer, it will only ask them for their contact information, rather than giving them all the options that Standard Installer provides. This is a great way to get your customers to install Kabuto for you.

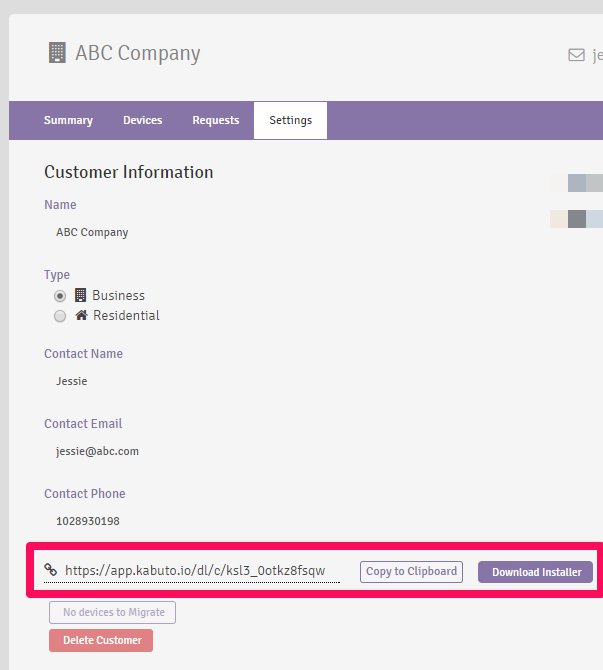
Public URL for Customer Installer
We provide you with a unique direct download URL for each Kabuto Customer. You can find this link in two ways:
- Press the “Download Installer” button on your Kabuto Online Dashboard. Select a specific Customer, and then copy/paste the link provided.
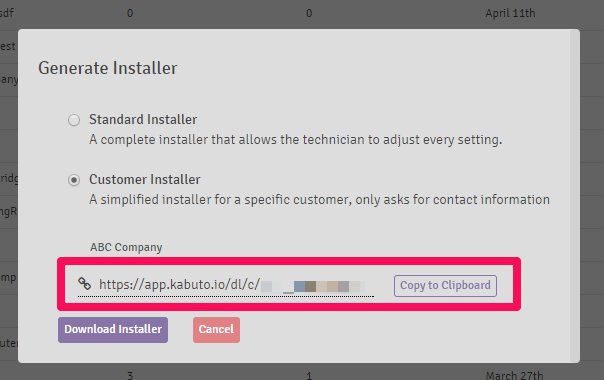
- Go to the “Customers” page on your Kabuto Online Dashboard, and then select a specific Customer. Once you’re viewing that Customer, go to the Settings tab, and copy/paste the link at the bottom of that tab.
Triggers
Put simply, triggers are the conditions that the Kabuto agent monitors on a device. All activated triggers are scanned on regular 6 hour intervals to minimize overall CPU load. Once a trigger event occurs, a corresponding alert will appear to the device owner.
List of Triggers
- HDD SMART Failure
- Blue Screen of Death (BSOD)
- Problem in Device Manager
- Low Drive Space
- Firewall Disabled
- Application Crash
- Defrag Needed
- No Antivirus
- Custom Timer
HDD SMART Failure – Runs a standard SMART test on the system drive
Blue Screen of Death (BSOD) – Checks logs for any BSOD occurrences since last scan
Problem in Device Manager – Checks for any installed devices with any status other than “This device is working properly.”
Low Drive Space – Checks for “low storage” space (defined as less than 15% free space) on the system drive
Firewall Disabled – Checks Windows Firewall state and report if it is disabled
Application Crash – Checks for application crash logs
Defrag Needed – Checks WMI DefragAnalysis to see if a defragmentation is needed
No Antivirus – Checks Security Center for an installed Antivirus software
Custom Timer – The customer can receive a recurring alert saying “Just checking in, feel free to let us know if you have any questions”. This message will soon, but is not currently customizable. The interval (measured in days) is editable from the dashboard. The default is set to 90 days.
If you would like to request additional triggers, please submit a feature request via by submitting a ticket.
Customers
Customers are the top-level of Kabuto. Devices belong to Customers and as such Customers are required to exist before (or as part of) device creation. Viewing information from a Customer page allows the tech to focus down on the information pertaining to only that group or company. Customers have the contact information Name/Company, Phone, and Email.
Devices
As more and more devices are set up, they will immediately appear on the Dashboard. Devices belong to Customers but also contain their own contact information including Name, Phone and Email which can be viewed by viewing the device (double-clicking the row or clicking “View”).
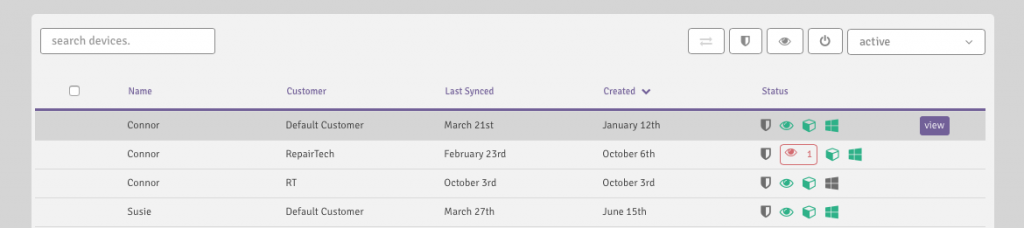
The Devices table can be sorted by Creation Time in ascending or descending order. Additionally, it is possible to view devices with the statuses: Active, Inactive,Monitoring On/Off, Customer Installed. Both sorting and views are found in the top right of the main-pane. The “Status” column displays color-coded icons, which refer to the device’s Upgrades(see below): Monitoring and Managed AV.
The actions you can perform on this page are turning on the various Upgrades (Shield and Eye Icon) for one or many Devices and also transferring them to a different Customer (horizontal arrows).
Tip: To select devices, simply click the device with your mouse. To select multiple devices, both CTRL and SHIFT can be used to do so.
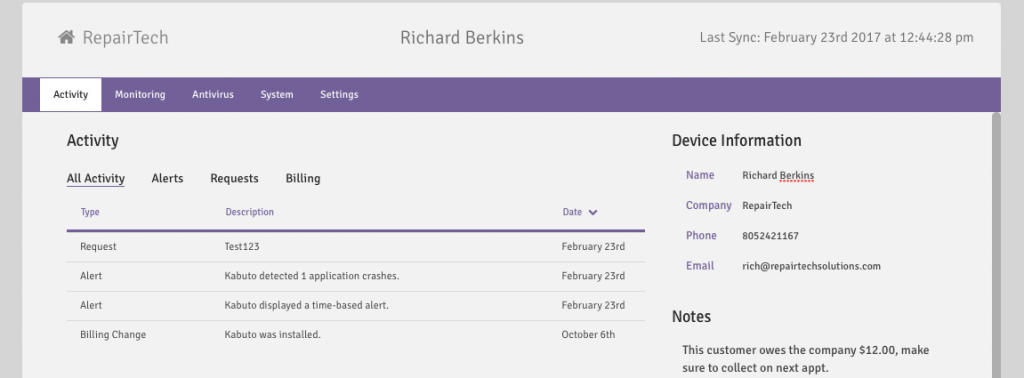
Activity Tab
The device’s latest information can be viewed along with contact information and Notes on the customer.
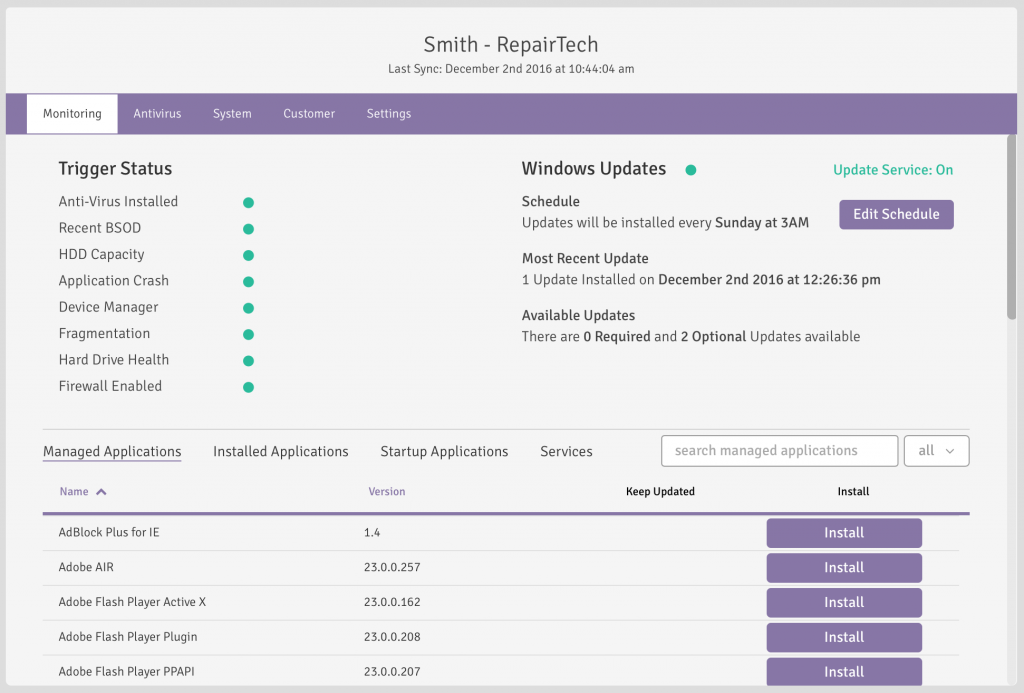
Monitoring Tab
The Monitoring tab in the side-pane displays all active triggers, monitoring status, and a timestamp from the last update.
Managed Antivirus Tab
The Managed Antivirus tab in the side-pane displays automated scan preferences, logs from previous scans, and status of Emsisoft’s protection components.
Device Information Tab
The Device Information tab in the side pane displays the device owner’s contact information. To edit this information simply click on the field and update the content. A checkmark will appear to the right of the field once it is saved.
Settings Tab
Activating and Deactivating Devices
If you no longer want Kabuto to run on a selected device, you can deactivate it. This will prevent Kabuto from showing alerts to your client on their device. You can always re-activate a device after you’ve deactivated it.
Choosing Which Triggers Will Show an Alert to Your Client

Each of the boxes above are a trigger. You can choose which trigger will show an Alert to your client via the Kabuto Windows App when the trigger has an event. You may want to disable certain triggers here if you only want to monitor the client’s device, rather than have them Request Service.
Common actions on the Devices Page
Deactivating a device – Navigate to the desired device’s Settings tab and click “Deactivate”. The device will be removed from the Active list and put it in the Deactivated list.
Reactivating a device – Navigate to the desired device’s Settings tab and click “Activate Device”. The device will re-added to the Active list and triggers will be reset on the Kabuto client.
Adjusting Active Triggers – Navigate to the Settings tab of the desired device and either check or uncheck the box next to the appropriate trigger. The changes are saved immediately and reflected on the Kabuto client.
Update device information – To update the name, company, email, or phone information on a device, navigate to the Device Information tab and simply click the appropriate field. Modifications are saved immediately after clicking outside of the field.
Forcing a Sync
Kabuto normally syncs once every 6 hours, or on restart. However, you can force Kabuto to Sync by going to your Kabuto Online Dashboard, and then going to any device. Click the “Force Sync” button. This will tell Kabuto to immediately start syncing, and will put a little number next to the Connection Status. This number will go away once Kabuto has finished syncing. This can take a few minutes, or up to 30 minutes if you are trying to install Managed AV during that sync.

Policies
Policies are templates for device settings that you can use to set preferences, customize upgrades or change settings in bulk. This feature also makes adding new Devices much easier. You can create a Policy and specify your device settings, then simply apply that Policy to Devices as you see fit. Then you can modify changes to the Policy and it will change the settings of all related Devices in bulk.
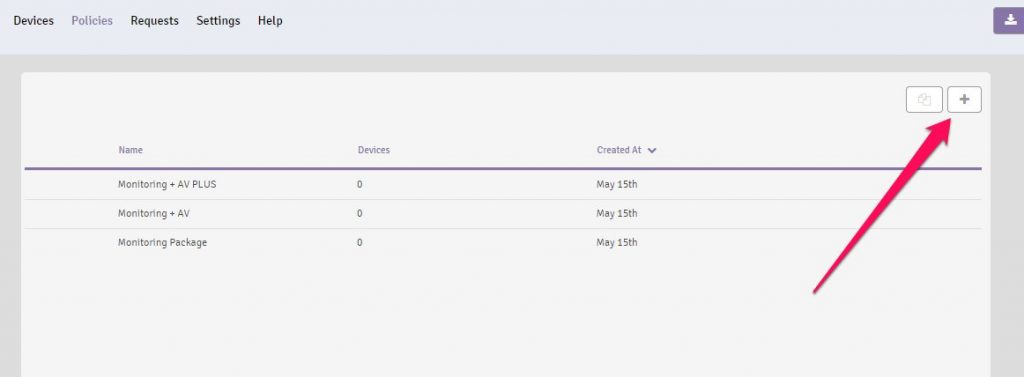
Creating a New Policy
To make a new Policy, head over the “Policies” page, and click the New button, shown below.
You can now go through each section of your new Policy and select the settings you’d like to apply:
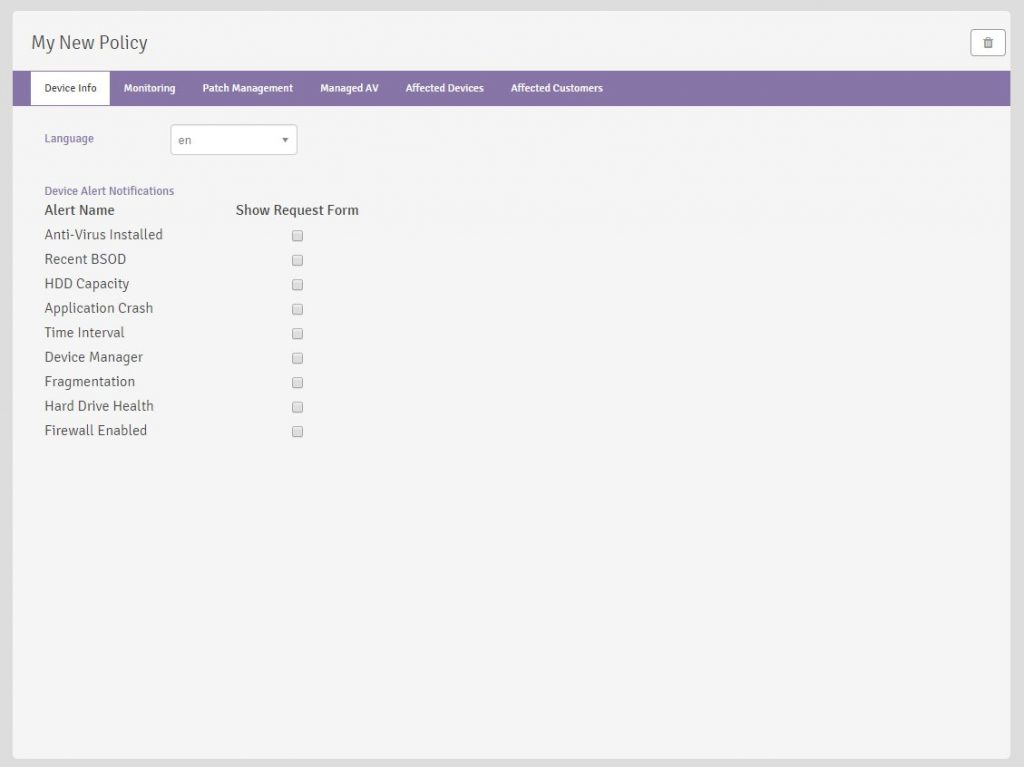
Once you’ve saved your Policy, you can apply it to Devices.
Applying a Policy to Devices
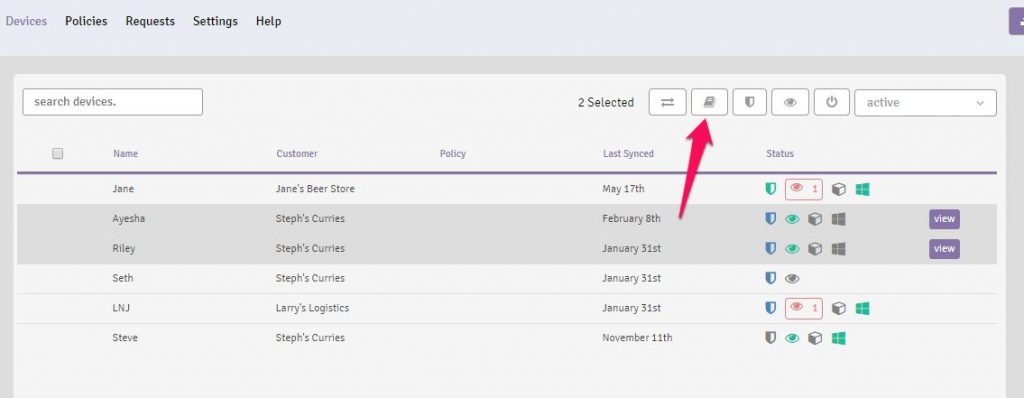
There are two ways to apply a Policy to a Device.
1) On the Devices page, select one or more Devices, and press the Policy button.
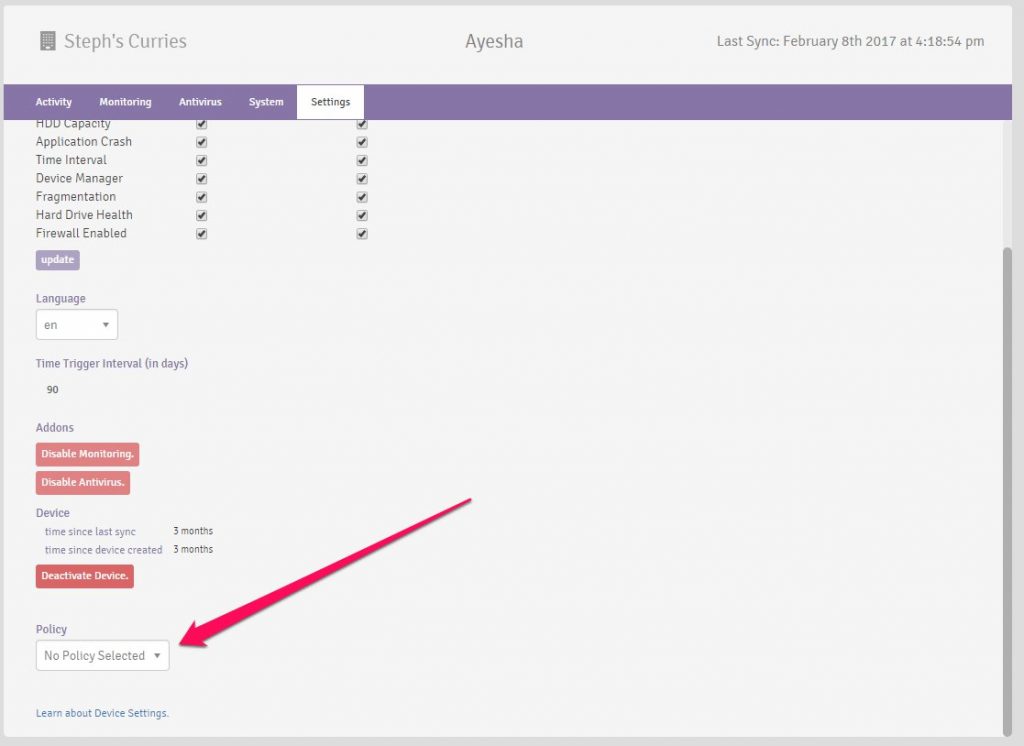
2) On a particular Device’s Settings page, select the Policy.
Setting the Default Policy for a Customer
You can also set a Default Policy to a Customer. This will automatically apply the Policy to all new Devices that you add to that Customer. It does not apply the Policy to existing Devices under that Customer. You can set the Default Policy in the Customers’ Settings tab, or from the Customers page.
Modifying a Device that has a Policy
If you change any settings on a Device that has a Policy applied to it, Kabuto will let you make the changes, and remove the Policy.
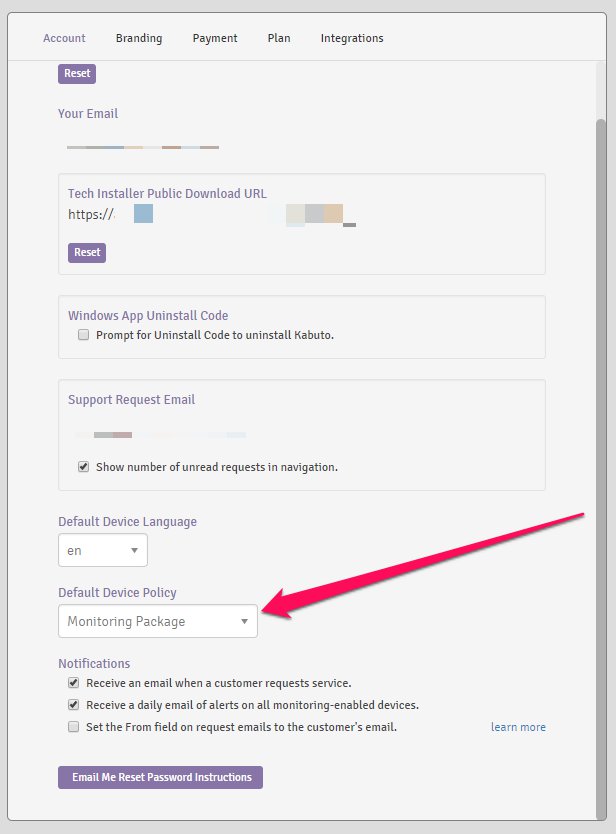
Setting the Default Policy for your Account
You can set the Default Policy for your entire Account by going to the Settings page.
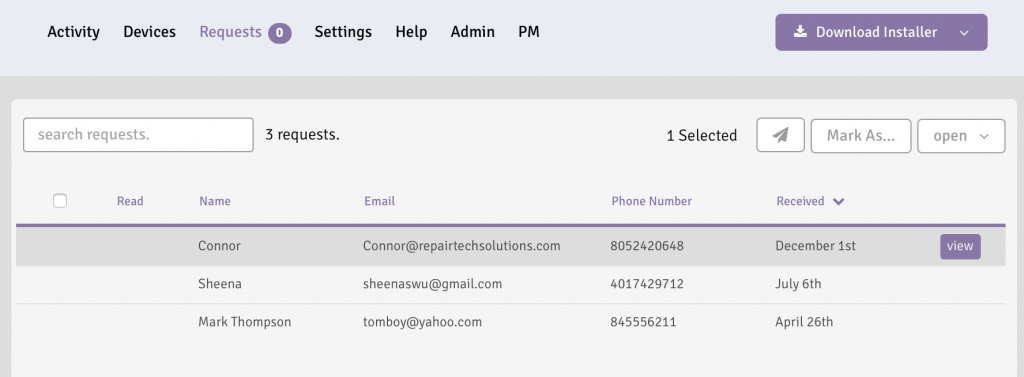
Requests
When the Kabuto client triggers an alert, the device owner has the option to Request Service; if acted upon, the alert will send a Request for Service to the Requests page on the Dashboard. A corresponding email notification will be sent to the technician summarizing the devices trigger events. Up-to-date device-owner information is provided for the technician to reach out to the owner and support their Request for Service.
Fixing the “I’m not receiving emails for Requests” Issue
If you’re not receiving emails when a client requests service, your spam filter is probably catching the email because you have the “Set the From field on request emails to the customer’s email” option checked. To fix this, simply uncheck this box:

Monitoring Upgrade
Monitoring allows you to see what issues are affecting your client’s devices and proactively contact them, rather than waiting for them to Request Service from you.
Benefits of Monitoring
As mentioned above, Monitoring notifies you when a client’s device needs attention. The majority of technicians using Monitoring will resell it as a service to their clients.
Clients win by receiving faster repairs, quick access to support, and a higher quality of service overall.
Technicians win by knowing client’s issues ahead of time and having access to the device, it’s status, and specs.
Monitoring ROI
Monitoring pricing is simple and clear, $0.50/mo per Device. This makes it very easy to see how it will impact your business and if it is the right decision for you and your shop.
Techs using Kabuto typically resell a Monitoring package for $5-$15 per month to their clients. With that range, the additional revenue is $54 – $162 per device per year of net profit. For a more detailed breakdown on Kabuto’s ROI, feel free to look over our guide Getting Started with Kabuto.
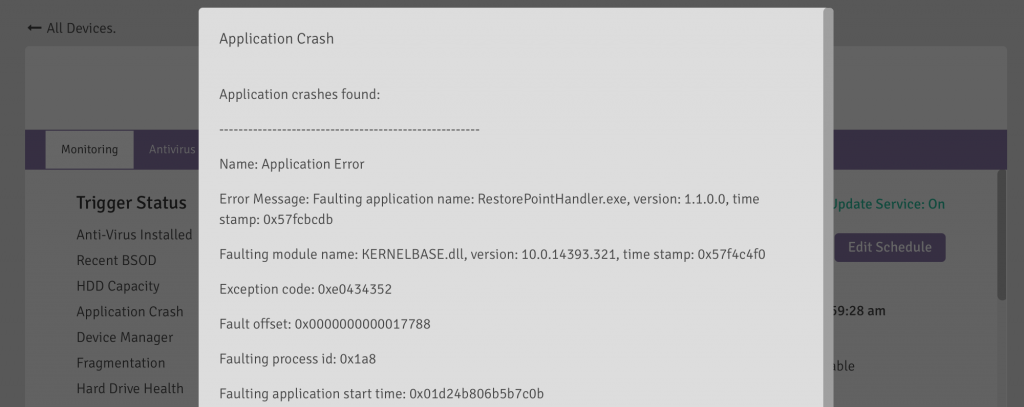
What happens when the client has an issue
When the Kabuto Windows App detects an issue, it creates an alert on your dashboard. This will turn the circle next to that trigger red. The screenshot above shows three alerts. You can view more information about that particular alert by clicking “view alert”.
Configuring Email Notifications for Alerts
You’ll receive an email every day (sent to your account email address) with a summary of your Monitored devices. This daily summary email will include all problems on all Monitored devices unless you specify otherwise.

Note the “Email Technician” column on the right. In this case, even if a Device Manager problem occurs, it won’t be included in this tech’s daily summary emails. This is handy for silencing certain types of alerts.
Note also that in this case, all of the items in the “Show Request Form” column on the left are unchecked. This technician’s client will never receive pop-ups from Kabuto – instead, the technician will be notified about the problem first, and then decide whether or not to contact his client.
Patch Management
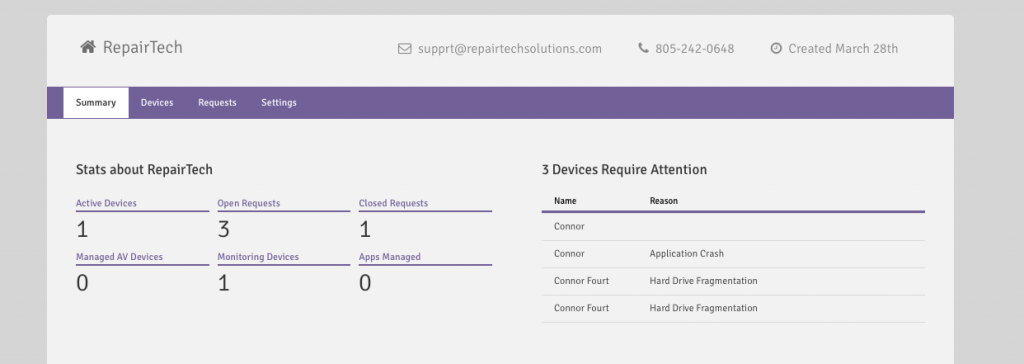
Summary
Patch Management allows for technicians to automatically keep their clients’ Windows operating system and 3rd party applications up to date and install new programs. Patch Management is not a separate upgrade and is part of Monitoring 🙂
Getting Started with Windows Patch Management
Setting the Windows update schedule in the Kabuto Dashboard is very simple. Head to your device’s page and select the Monitoring tab. Then in the top-right corner, find the button that says “Edit Schedule.” The default value Windows sets for this is 3AM. Your change will be sent to the device on next sync.
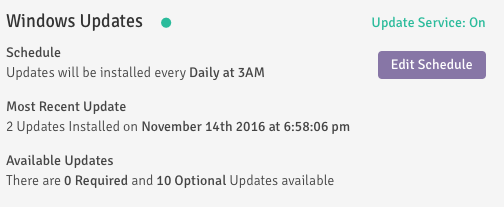
A note about this feature. This is the first of a two part update. The second update, coming early 2017 will allow for specific control over which Windows Updates are applied along with using an entirely independent update system to replace the Windows Update Service.
Getting started with Application Patch Management
Turning on Patch Management is simple. Visit your Device page and select the desired devices. Next select the ![]() button and click “Manage All Applications.” This will automatically keep all available applications up to date on those devices. If you would like to select which applications should be installed or kept up to date, navigate to the individual device and look towards the bottom of the page. On the “Manage Applications” tab you can install new applications and also keep core applications up to date. Any application that is installed on the device will automatically be set to be kept up to date.
button and click “Manage All Applications.” This will automatically keep all available applications up to date on those devices. If you would like to select which applications should be installed or kept up to date, navigate to the individual device and look towards the bottom of the page. On the “Manage Applications” tab you can install new applications and also keep core applications up to date. Any application that is installed on the device will automatically be set to be kept up to date.
Keeping installed applications up to date
To manually select which applications should be kept up to date, first select a device and click “View”. Next, selected the “Monitoring” tab and scroll down to expose the desired program. Finally, either check or uncheck the appropriate boxes in the “Keep Updated” column.
What to expect
On each Kabuto sync, it will check for out of date apps and update them if necessary. Out-of-date applications will be colored red while up-to-date applications will be colored black. If an application fails to update, you will be notified via the Daily Summary Email.
Installing new applications
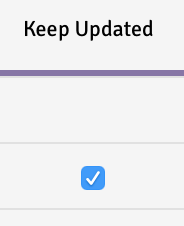
Patch Management also has the ability to install new applications to the device. This installation process requires only pressing the “Install” button found on the Monitoring > Managed Applications tab.
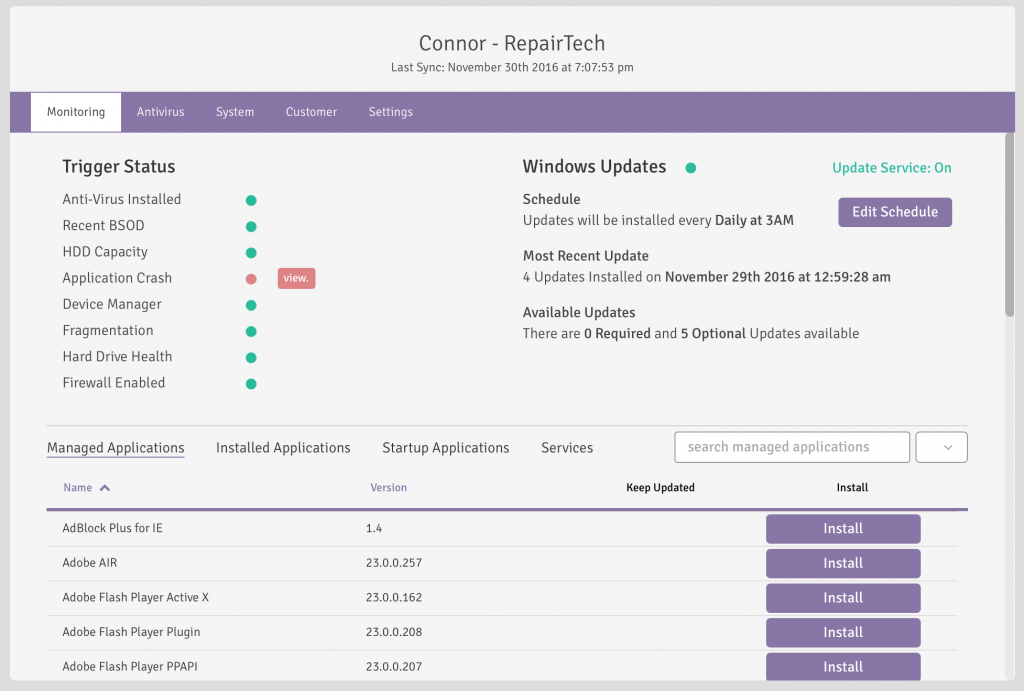
After clicking “Install” the application will be installed to the device on next sync. The application will also automatically be managed from that point on. This is indicated by the checkmark under “Keep Updated”.
![]()
Uninstalling applications
As of now, Kabuto cannot uninstall applications remotely.
Applications managed
Kabuto will manage this list of 39 important applications with frequent vulnerabilities:
- Adobe AIR
- Adobe Flash Player Active X
- Adobe Flash Player Plugin
- Adobe Flash Player PPAPI
- Adobe Reader
- CCleaner
- CDBurnerXP
- Dropbox
- Evernote
- FileZilla
- Foxit Reader
- Gimp
- Google Chrome
- Google Drive
- Inkscape
- Irfan View
- iTunes
- JDK8
- JRE8
- LibreOffice
- MalwareBytes
- Mozilla Firefox
- NodeJS
- Notepad++
- Opera
- Pidgin
- Quicktime
- Silverlight
- Skype
- Steam
- Sublime Text 3
- TeamViewer
- TightVNC
- TortoiseSVN
- Thunderbird
- VLC
- Web of Trust for IE
- WinRAR
- WinScp
Note: This list is consistently growing. To update devices to keep all new available applications up to date, navigate to the dashboard and select the appropriate devices. From there, Toggle Patch Management Off and then On again.
Troubleshooting
While these are unexpected, if you experience any issues with Patch Management, please follow the instructions below to attempt a resolution.
If Kabuto falsely detects an application is out of date
Please contact support@repairtechsolutions.com. We should be able to resolve the issue very quickly
If Kabuto detects an application is out of date but the update fails
Restart the device. Soon after the system reboots, Kabuto will re-attempt the installation. If Kabuto can’t update the application at this point, more investigation will be required; again, please contact support@repairtechsolutions.com.
Managed Antivirus Upgrade
Managed Antivirus adds licensed copies of Emsisoft to your customers’ devices, and activates the “Antivirus” tab for those devices.
Enabling the upgrade
- Select a device in your Kabuto dashboard > “View”
- Navigate to the “Anti-Virus” tab and enable Managed Antivirus
- The next time Kabuto syncs on that device, Emsisoft will install

You can do this on 1 device at a time, 10 devices at a time, or 100. There is no minimum for the upgrade, and there is no maximum.
Kabuto Dashboard
- Set up scheduled scans (daily, weekly, monthly)
- Run scans on demand
- Review scan logs to understand threats, scan duration, etc.
- Enable Real-Time Protection
- Enable Surf Protection
- Verify definitions are up to date

The Managed Antivirus Dashboard

An Example Managed Antivirus scan log
At $2 per month per device, it can provide a mutually beneficial service to your customers with a healthy profit margin.
Installing Emsisoft Anti-Malware for Kabuto Managed AV
There are three ways to install EAM for use with Kabuto Managed AV:
1) Enable Managed AV via the Kabuto Installer and wait for Kabuto to sync. It will then install Kabuto automatically.
2) Enable Managed AV via the Kabuto Online Dashboard and wait for Kabuto to sync. It will then install Kabuto automatically.
3) Manually install EAM on the device, and then turn on Managed AV from the Kabuto Online Dashboard. On next sync, Kabuto will detect that EAM is already installed.
Uninstallation of Emsisoft Anti-Malware
If you installed EAM using method (1) or (2) above and then disable Managed AV or uninstall Kabuto, Kabuto will automatically uninstall EAM. We’ll also automatically expire the EAM license within 24 hours.
If you installed EAM using method (3) above, and then disabled Managed AV or uninstall Kabuto, we’ll leave EAM installed, but expire the license within 24 hours.
NOTE: If you’re using your own EAM license, rather than one of ours, we do not expire the license.
Using your own license with Kabuto Managed AV
If you want to bring your own Emsisoft Anti-Malware license to use with Kabuto Managed AV, you can do that. We’ll charge you $0.50 for the management, instead of $2.00. There is one downside, which is that we don’t renew the license for you if it expires.
Here’s the proper way to use Bring-Your-Own-Key so that you don’t get double-charged:
1) Make sure your Default Policy for your Account (Settings page) is set to a Policy that does NOT have Managed AV enabled.
2) Make sure the Customer that you’re installing Managed AV for does NOT have a Default Policy that has Managed AV enabled.
3) Install Kabuto on the machine with Managed AV disabled.
4) Once it finishes syncing for the first time, go to the Kabuto Online Dashboard, and click to enable Managed AV for that Device. In the modal you’ll see a link in the bottom right that says “I already have an Emsisoft license”. Click this link. Screenshot below:

5) Enter your key, and then click “Enable Antivirus”.
6) Restart the device. Within 30 minutes it will install Emsisoft Anti-Malware with your key.
7) All done! You can now freely apply Policies to this Device.
Settings
Notifications
Notifications can be adjusted via Settings > Configuration. The technician can receive email notifications in two cases: when an existing device owner requests service (“

Custom Branding
Two different images can be uploaded to custom brand the Kabuto client that device owners see. The first is the Logo which is a banner style image with the dimensions 100×500. The second is the Icon which is a square image with the dimensions 48×48 (this image size is supported on operating systems prior to Windows 8). Both images, if not matching the appropriate size will be scaled to contain the whole image.
Additionally, a custom accent color can be specified for the Windows App. To learn more about this, click here.
Both images are pulled each time the Kabuto client runs on the device to keep branding consistent and up to date.
To upload or view custom branding images, navigate to Settings > Configuration on the Dashboard.
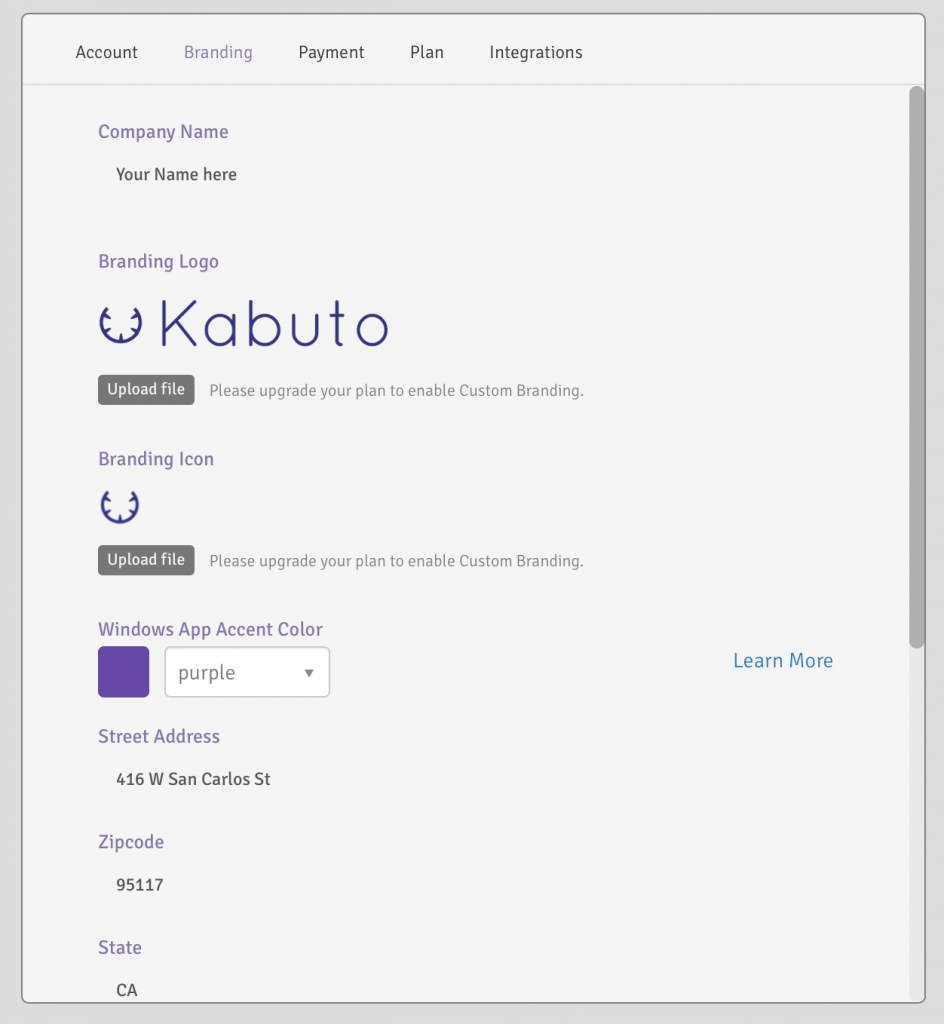
Shop Information – Each shop has unique information which is dynamically provided to each device. Those fields include:
- Company Name
- Street Address
- Zip Code
- State
- City
- Country
- Operating Hours
- Phone Number
- Contact Email
If adjusted on the Dashboard, each Kabuto client will import the new information and display it when the device owner requests service.
To adjust account contact information, navigate to Settings > Branding.
Requests
Kabuto’s Online Dashboard gives you an option to set the “From” field in emails sent notifying you of new Requests.
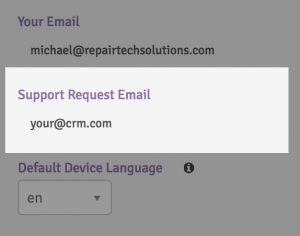
This option is preferable if you’re using a CRM that creates a new ticket based on the email’s “From” field. It also enables you to simply click “Reply” when receiving the email to contact the customer. The downside to this option is it may make it more likely that the email is marked as spam, as it is not actually being sent by the customer.
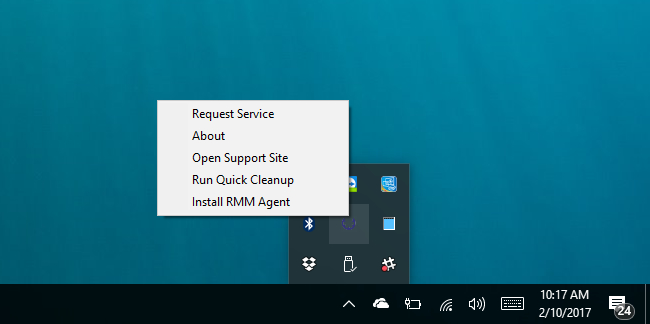
Custom Menu Entries
The Kabuto Windows agent contains a right-click context menu as part of it’s system tray icon.

Each entry to this menu can be added via the your Kabuto dashboard, each with three different options: Open File (sourced from File), Open File (sourced from URL), and Open Webpage.
Open File: URL will take a file found at a URL and pass that to the Kabuto agent to run. The file must be an executable and the URL must be direct, meaning the filename and extension must be at the end of the provided URL.
Open File: Upload will take a file uploaded to the Dashboard and pass that to Kabuto run. The file must be an executable.
Open Webpage will open the default browser to the specified URL. Note, the URL must have http:// or https:// to be recognized by Windows operating systems.
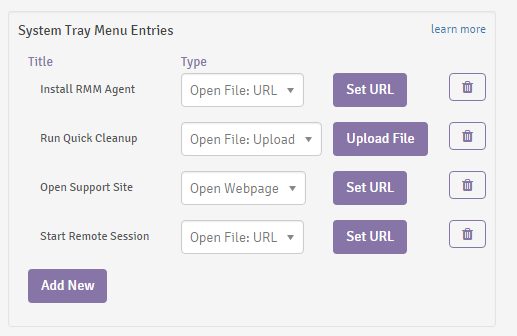
Below are example use cases of menu entries: Launching an remote executable, Opening your support website, Run a cleanup script, and (not pictured) Start a remote session.
For more information on Integrations, including using different remote session (aka remote desktop) executables, please check out this page: Kabuto Integrations
Supported Devices
Kabuto fully supports Windows 7, 8, 8.1, and 10. The Kabuto Agent can also technically be installed on Windows Server Editions but we do not test as extensively on Server Editions. In addition, Kabuto Managed Antivirus does not work on Server Editions.
Generating an ICO file for Custom Branding
Kabuto Custom Branding allows you to add your own custom icon in the form of an ico file. Here are instructions for how to make your own ico file:
- Download your favorite image editor. We recommend using GIMP.
- Open your logo image file
- Make sure image is square (use dimensions: 48×48, 64×64, or 128×128)
- “Export As” .ico file
We also have a library of free icons that are modified versions of Font Awesome icons, that you can use if you don’t want to make your own. They’re available as a zip file here.

Troubleshooting Syncing Issues
- Check to see if Kabuto is still in your Control Panel programs list (if not, just re-install Kabuto).
- If Kabuto is in “C:\Program Files\Kabuto”, then re-install Kabuto (You’re using a legacy version)
- If Kabuto is in “C:\Program Files\RepairTech\Kabuto”, then open Task Manager, go to Services Tab, and “Start” the Service named “Kabuto”
[/et_pb_text][/et_pb_column_inner][/et_pb_row_inner][/et_pb_column][/et_pb_section]