Integrations
RMM Integration
TechSuite’s Console version can be used with any RMM solution to automatically run tools remotely. We have created a PowerShell script to make it easy to integrate into your RMM. The following example is for Continuum, but the same can be done with most RMM’s. It downloads TechSuite, runs the Procedure of your choice, uploads a Report to our Online Dashboard, and then closes and removes TechSuite from the machine. Here’s how you integrate it into your RMM:
- Download the TechSuite RMM PowerShell script here.
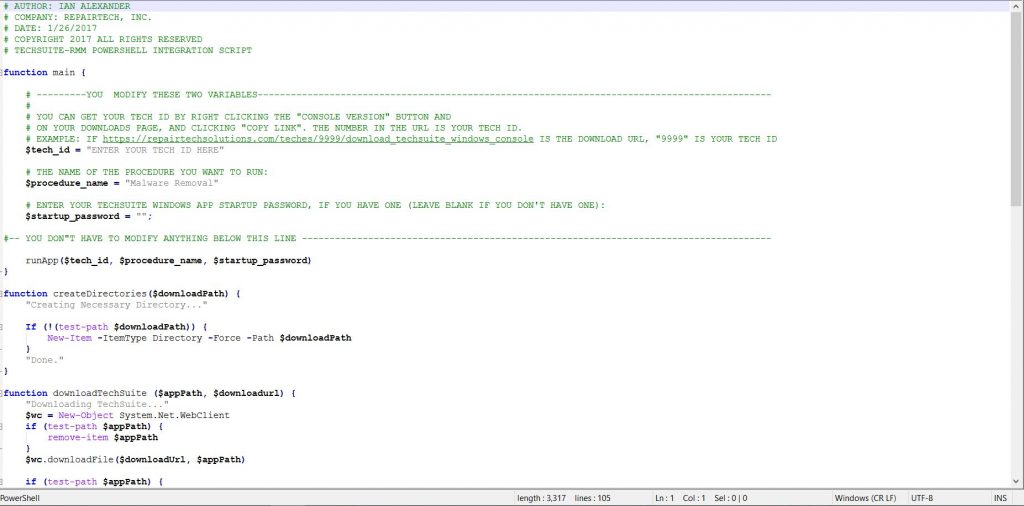
- Open it with any text editor (notepad++, notepad, etc). It should look like this:
- Go to your TechSuite Online Dashboard > Downloads page. Right click on the “Console Version” button, and click “Copy Link Location” (exact text may vary based on browser).
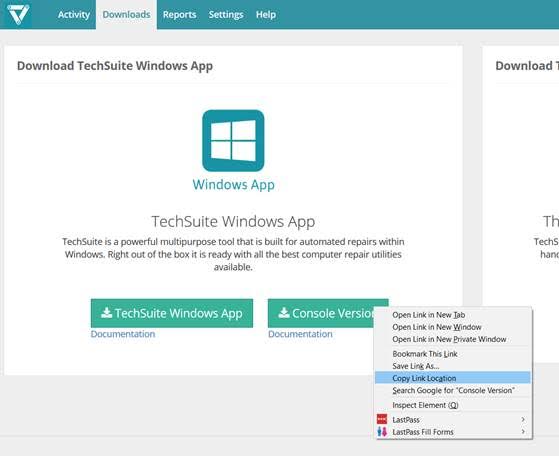
- Paste this text somewhere so you can see the contents. It should look something like this:
https://repairtechsolutions.com/teches/999999/download_techsuite_windows_console
- Take note of the number in the that URL (999999) in the above example. This is your Tech ID and we will need this in the next step.
- Replace the value of $tech_id with your Tech ID from step 5 above, so that it contains the correct number:
 NOTE: The quotes around “9999” are mandatory. This applies for the remainder of these find/replace steps.
 - Replace the value of the $procedure_name variable with the name of the TechSuite Windows App Procedure you’d like to run:

- If you have a TechSuite Windows App startup password, replace the value of $startup_password with it:

NOTE: This is not your TechSuite Online Dashboard password. This is a password you have to manually set that shows up when TechSuite Windows App is run.
- Enter your API Key into the API Key variable. You can find your API Key on the TechSuite Online Dashboard “Settings” page, under the “App Settings” tab.
- Save this file.
- Open Continuum, and copy/paste the info into the Script Building modal here:
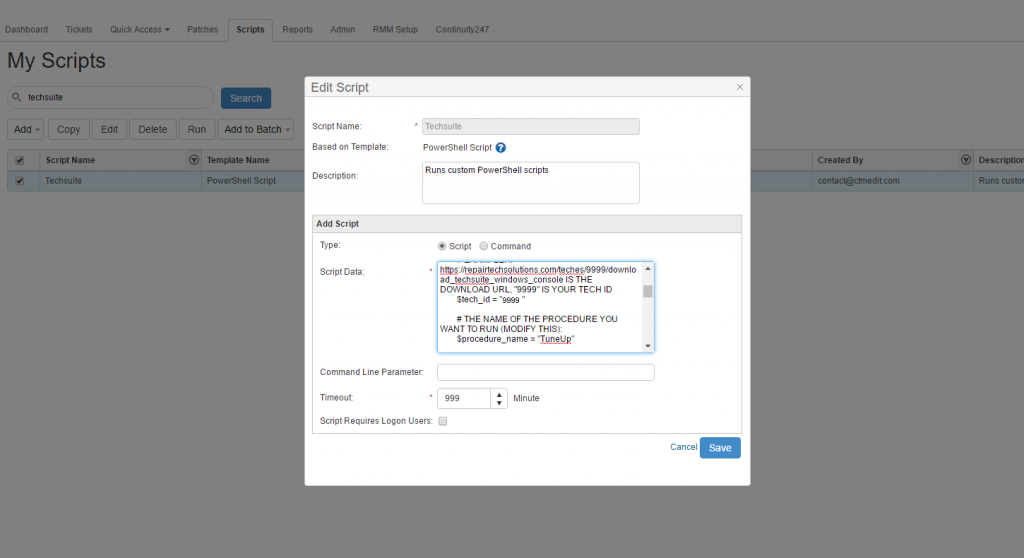
- Now you should be good to go. You can run this Script on any computer in your RMM solution.
Instant Housecall
Instant Housecall‘s integration allows techs to remote into a client’s machine and immediately call down a TechSuite executable to use on that machine. Here’s a guide on how to set that integration up.
- Go to IHC Admin Dashboard
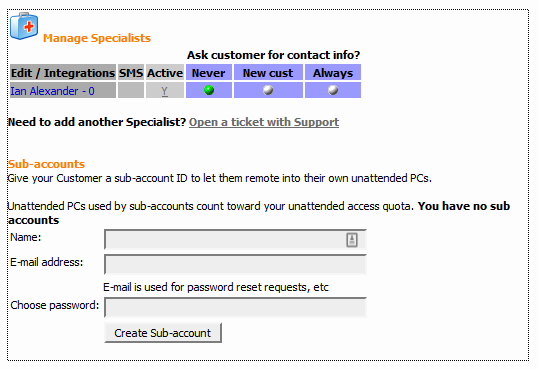
- Click the name of your Specialist, in this case “Ian Alexander”
- Enter your TechSuite API Key and Account Email
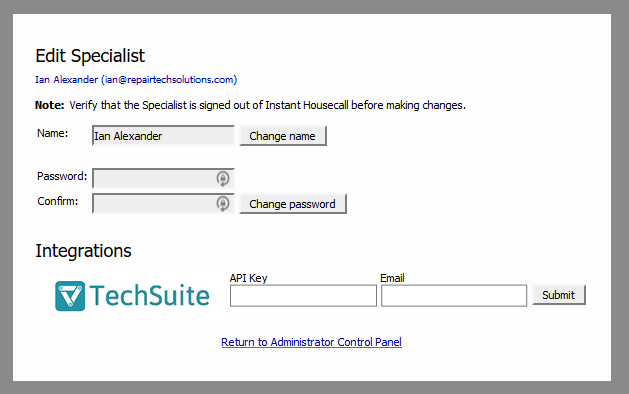
- To grab your TechSuite authentication key, head to your Dashboard > Settings > Application Settings

Autotask
Sync your TechSuite Reports with your existing Autotask tickets. Simply login to your Dashboard, go to the ‘Tools’ tab, select Autotask, and enter your Autotask credentials.
Autotask Corporation provides the world’s leading hosted IT business management software to streamline and optimize business processes for technology solution providers. The software integrates a broad range of critical business systems, including customer relationship management (CRM), service desk, contracts, tech scheduling, project management, billing and reporting, and provides real-time service delivery intelligence to help users understand the factors that drive their business and their profitability. Learn more about Autotask.
RepairShopr
Sync your RepairTech Reports with Active Tickets on RepairShopr. Simply enter the ticket # you want a report attached to in TechSuite Bootable or the TechSuite Windows App, and we’ll attach it to your RepairShopr ticket once it’s uploaded to TechSuite Dashboard.
There is a special API key for the RepairTech-RepairShopr integration. To find the correct API key, go to your RepairShopr account > Admin > App Center > RepairTech. There you will find the correct API key.
RepairShopr is an all-in-one system integrating tickets, CRM, invoices, and marketing in a simple, easy-to-use platform specifically designed for computer repair shops. The streamlined workflow allows you to increase shop efficiency while powerful lead and marketing tools help you build customer relationships to grow your business. Learn more about RepairShopr.
Screenconnect
We’ve engineered the TechSuite Windows app to work perfectly with ScreenConnect’s Toolbox feature so that you can have all your applications in your remote sessions. To find out more about setting up this integration, check out this how-to guide.
Screenconnect is a self-hosted remote support, access, and meeting solution. We partnered with Screenconnect in late 2013 to form what we believe to be the best way to deliver the TechSuite Windows App remotely. Use remote support and access to repair computers, provide updates, and manage machines. Conduct online seminars and presentations using remote meetings. Screenconnect is a comprehensive, one-time-payment alternative to the expensive SaaS-based solutions that charge recurring monthly fees.
How to get set up
1. Firstly, head to your Downloads page on TechSuite Dashboard and download TechSuite Windows App (you won’t need the console version unless you intend to run TechSuite via the cmd.exe)
2. Next, on your Screenconnect server, head to your Personal Folder, typically that is C:\Users\USERNAME\Documents\ScreenConnect\Toolbox
3. Drop TechSuite.exe into that folder.
That’s it! The next time that you remote into a client’s machine, you’ll see TechSuite in that folder. If that doesn’t make sense, or your configuration is different, here’s another explanation from Screenconnect on how to set this up.
CommitCRM
Sync your RepairTech Reports with Active Tickets on CommitCRM. Simply enter the ticket # you want a report attached to in TechSuite Bootable or the TechSuite Windows app , and we’ll attach it to your CommitCRM ticket once it’s uploaded to your Dashboard.
All you need to do is set up the CommitCRM Email Connector module and add commitcrm@repairtechsolutions.com to your CommitCRM contacts.
CommitCRM is an affordable CRM, Service Management, and Billing solution for IT Professionals. Strengthen customer relationships, resolve issues faster, and maximize your billing and invoicing.
Webhook Integration
Want to integrate with Google Drive? Dropbox? Twilio? You can use our Webhook integration to do so. The easiest way to do so is to use a service like Zapier or If This Then That. Simply insert the URL you’d like us to POST the Report to, and we’ll send it as soon as your Reports are uploaded.
If you’re writing an integration yourself, the following JSON body is POST-ed to the URL you provide:
{
"logpath": "https://repairtechsolutions.com/reports/98765",
"customer_name: "John Smith",
"ticket_number": "123456",
"tool": "TechSuite",
"tech_email": "yourtech@yourdomain.com"
}
PC Repair Tracker
Syncing your RepairTech Reports with Tickets on PC Repair Tracker is relatively simple. To do so, contact Luke at PC RepairTracker for an additional module to add to your code. Once added you’ll have access to a POST URL that can be pasted into the PCRT Integration page in TechSuite. To test, run a tool in TechSuite with a ticket number from PCRT. Once the report is finished and uploaded, you’ll see it show up!
If you have any additional integrations you would like to see, please let us know at support@repairtechsolutions.com.
