
TechSuite Windows App

Purpose
TechSuite is a computer repair multi-tool. Designed for one-click automation in all repair scenarios in the Windows® operating system. It’s completely automated, portable, and command-line accessible.
Core functionality includes:
- Gathering System Information
- Hardware Diagnostics and Benchmarking
- Malware Removal
- System/Application Cleanup
- Windows Fixes
- Networking Utilities and Fixes
- Browser Checks
- System Tweaks
- System Tuneup
- Application Installation/Updates
- Data backup/recovery utilities
- Gorgeous Reporting
- Custom Applications
- White labelled
Getting Started
To use TechSuite, head to your Downloads page on the Dashboard and click “Download TechSuite”. When starting TechSuite.exe a folder will be created in the same directory. The Assets folder is where run-time data, files and folders are stored. Feel free to move or remove this folder after you are finished your repair work.
Some Terms
Before we get too far into how to use TechSuite, we’d like to introduce a few terms to make everything easier to understand:
Tools – TechSuite uses commercially available tools and automates them. Each tool has a category to be found by.
Tool Mode – TechSuite tools have modes such as “Manual” and “Automated”. These modes augment how tools behave.
Category – a list of tools of a certain type or function
Procedure – A list of tools. The queue is run when the “Run” button is pressed. These can be saved and loaded later.
Report – Each queue will produce a report when complete. It contains the output from each tool run in the queue.
Customer Name & Ticket Number – To keep your repairs and reports organized, we provide a name and number field to be used. Reports can be searched and organized by these parameters.
Title – One optional parameter allowing you to distinguish between multiple reports for the same customer. E.g. one repair being titled “Network Repair” and the next “Malware Removal”
Running your First Repair
There are two ways to use TechSuite: First, you can run a single tool. To do that, head to the tools page, search for a tool or type of tool and click “Run”. Second you can run a set of tools, a Procedure.
To run a single Tool
To run a Procedure
The second way to use TechSuite is to run a Procedure. A Procedure allows you to run many tools with a single click. Typically, procedures are designed with a purpose; take for example the RepairTech Malware Removal Preset, we’ve designed this preset to backup settings, clear temp files, check the registry, remove malware applications and scripts, and return the PC back to normal operating behavior. We have provided you with many presets to get you started. The RepairTech Default Procedure, as its name implies, our recommended default procedure to begin with.After selecting a procedure or tool to run, TechSuite will automatically run those tools and gather the relevant output for you report file. These reports are backed up onto your Dashboard to be available when you need them.
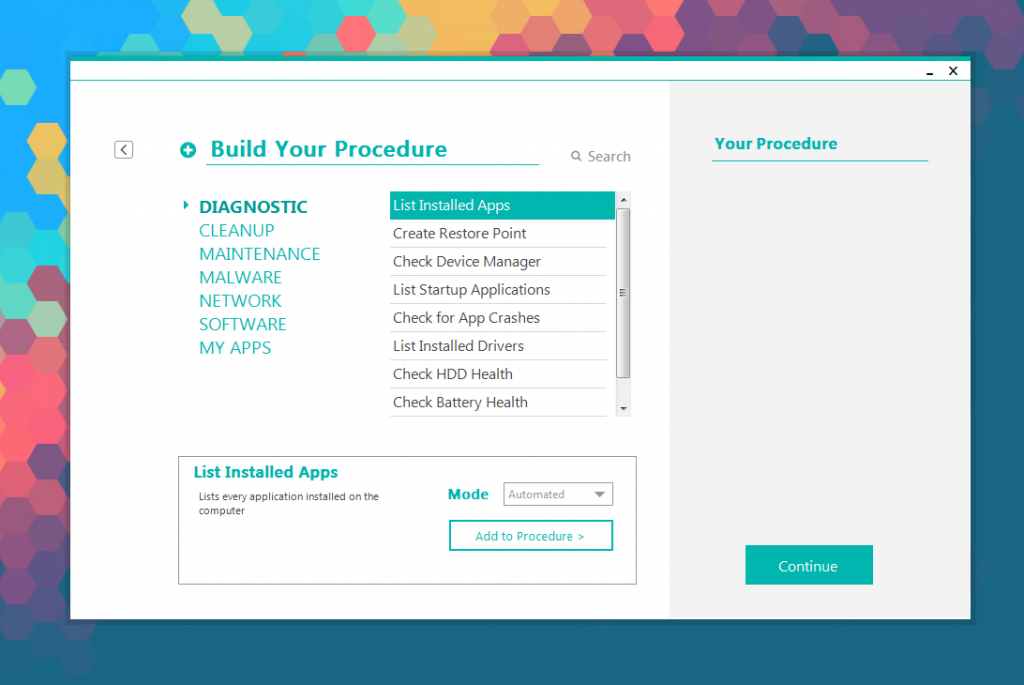
Building a Procedure of your own
To build a procedure with TechSuite, begin by clicking the “New” Button on the Procedures page. From here, adding a tool is as simple as selecting a category and the tool you’d like to add. To add a tool to a queue, you may either double click the tool or click the tool and then the “Add to Procedure >” button.
* If you’re curious about what a tool can do, there is a description the list of tools
Editing an existing Procedure
Procedures are meant to be customized. If you want to customize our defaults or one of your own, it’s very simple. Simply click “EDIT” in the details pane once you’ve select the procedure. Check out the video below.
From that page, you can add new tools, remove tools, reorder existing tools and rename the procedure. Additionally using the red “DELETE” button in the top right corner, you can remove this procedure altogether.
Tool Modes
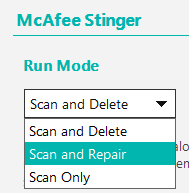
Tool modes augment the default behavior of tools during run-time. These modes are simple descriptions such as “Silent Scan”, “Default”, or “Manual”. Modes are specific to individual tools. In the example below, McAfee Stinger is being set to “Scan and Repair”. Tool modes can be can be set for tools that are about to be added to a Procedure or run individually.
Default Procedures List
TechSuite ships with several procedures to get you started quickly. Each has a unique focus and we’ve paid special attention to the tools going into these to cover the focus most effectively. Below are short descriptions for those procedures.
- Basic Diagnostics – A quick way to gather information about the device by checking components, OS, and account data
- Cleanup – A cleaning procedure designed to quickly remove temporary files, caches, and other clutter on the device
- Install/Update Apps – A fast way to get a core list of applications and utilities up to date and security issues patched
- Malware Removal – A comprehensive procedure to clean temp files and clutter and remove malware with dozens of scanners
- Fix Internet Issues – A quick but comprehensive internet refresh procedure
RepairTech will from time to time update or add new default procedures to better serve techs using TechSuite. If you have any suggestions for how to improve these, please email us at support@repairtechsolutions.com.
Custom Apps
Custom apps allow techs to add any tool to TechSuite they like. The process is very simple.
- Head to Tools and select “My Apps”
- Click “New”
- Name your application, it’s supported OS, and provide a description if necessary
- Provide either a download link (or two if there are different 32/64 bit versions) for your app or a local file*
- Provide information about CMD arguments and where log files are saved
- Save your app!
* Local files will be backed up online. This is so those apps will be immediately available when downloading TechSuite onto a new machine
Any custom apps are added to their own category called “My Apps” which is visible on the Tools page. A special note about “requiring manual interaction”, a manual interaction utility will pause TechSuite so we recommend putting these tools either at the beginning or end of your procedure.
Environment Variables (ENV Vars)
Using Environmental Variables (ENV Vars) for custom apps is a simple way to get tool-output into the report.
Example: %tool_path%\Emsisoft\logs
>{path to Emsisoft app location}/Emsisoft\logs
%ALLUSERSPROFILE% - C:\ProgramData

%APPDATA% - C:\Users\{username}\AppData\Roaming

%CD% - The current directory (string).

%ClientName% - Terminal servers only - the ComputerName of a remote host.

%CMDEXTVERSION% - The current Command Processor Extensions version number. (NT = "1",
%Win2000%+ = "2".)

%CMDCMDLINE% - The original command line that invoked the Command Processor.

%CommonProgramFiles% - C:\Program Files\Common Files

%COMMONPROGRAMFILES%(x86) - C:\Program Files (x86)\Common Files

%COMPUTERNAME% - {computername}

%COMSPEC% - C:\Windows\System32\cmd.exe or if running a 32 bit WOW - C:\Windows\SysWOW64\cmd.exe

%DATE% - The current date using same region specific format as DATE.

%ERRORLEVEL% - The current ERRORLEVEL value, automatically set when a program exits.

%"FPS_BROWSER_APP_PROFILE_STRING%

%FPS_BROWSER_USER_PROFILE_STRING%" - "Internet Explorer

%HighestNumaNodeNumber% - The highest NUMA node number on this computer.

%HOMEDRIVE% - C:

%HOMEPATH% - \Users\{username}

%LOCALAPPDATA% - C:\Users\{username}\AppData\Local

%LOGONSERVER% - \\{domain_logon_server}

%NUMBER_OF_PROCESSORS% - The Number of processors running on the machine.

%OS% - Operating system on the user's workstation.

%PATH% - C:\Windows\System32\;C:\Windows\;C:\Windows\System32\Wbem;{plus program
%paths%}

%PATHEXT% - ".COM; .EXE; .BAT; .CMD; .VBS; .VBE; .JS ; .WSF; .WSH; .MSC

PROCESSOR_ARCHITECTURE - AMD64/IA64/x86 This doesn't tell you the architecture of the processor but only of the current process, so it returns "x86" for a 32 bit WOW process
%running% on 64 bit Windows. See detecting OS 32/64 bit

%PROCESSOR_ARCHITEW6432% - =%ProgramFiles% (only available on 64 bit systems)

%PROCESSOR_IDENTIFIER% - Processor ID of the user's workstation.

%PROCESSOR_LEVEL% - Processor level of the user's workstation.

%PROCESSOR_REVISION% - Processor version of the user's workstation.

%ProgramW6432% =%PROCESSOR_ARCHITECTURE% (only available on 64 bit systems)

%ProgramData% - C:\ProgramData

%ProgramFiles% - C:\Program Files

%ProgramFiles%(x86)  - C:\Program Files (x86)

%PROMPT% - "Code for current command prompt format,usually $P$G

%C%:>"

%PSModulePath% - %SystemRoot%\system32\WindowsPowerShell\v1.0\Modules\

%Public% - C:\Users\Public

%RANDOM% - A random integer number, anything from 0 to 32,767 (inclusive).

%SessionName% - Terminal servers only - for a terminal server session, SessionName is a combination of the connection name, followed by #SessionNumber. For a console
%session%, SessionName returns "Console".

%SYSTEMDRIVE% - C:

%SYSTEMROOT% - "By default, Windows is installed to C:\Windows but there's no guarantee
%of% that, Windows can be installed to a different folder, or a different drive letter.

%systemroot% is a read-only system variable that will resolve to the correct location. NT 4.0, Windows 2000 and Windows NT 3.1 default to C:\WINNT"

%TEMP% and TMP - "C:\Users\{Username}\AppData\Local\Temp. Under XP this was \{username}\Local Settings\Temp"

%TIME% - The current time using same format as TIME.

%UserDnsDomain% - Set if a user is a logged on to a domain and returns the fully qualified DNS domain that the currently logged on user's account belongs to.

%USERDOMAIN% - {userdomain}

%USERDOMAIN_roamingprofile% - The user domain for RDS or standard roaming profile paths. Windows 8/10/2012 (or Windows 7/2008 with Q2664408)

%USERNAME% - {username}

%USERPROFILE% - "%SystemDrive%\Users\{username}This is equivalent to the $HOME environment variable in Unix/Linux"

%WINDIR% - "%WinDir% pre-dates Windows NT and seems to be superseded by %SystemRoot%. Set by default as windir=%SystemRoot%. %windir% is a regular variable and can be changed, which makes it less robust than
%%systemroot%%"
* (use if tool’s output is output via the command line)
Using Command Line Parameters in Custom Apps
Command line parameters allow applications to be run in various different ways via the console (CMD Prompt). The catch is that the developer has to build these in. For example, the parameter “–clean firefox” won’t work with every app but it will for bleachbit. If you want to run your custom app in a certain way, search their website to see if the developer has made any command line parameters. If they have, feel free to use those parameters when making a custom app. An example might look like this.
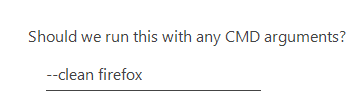
To continue with our example, we’ve typed “–clean firefox” in the middle field of the third page while creating a custom app
Hosted Custom App Usage
When creating a custom app using a local file, the application file or script is backed up online so that it can be seamlessly accessed by new instances of TechSuite. The cap for this storage is 1 GB. There is no limit to the quantity of applications so long as the total space required is under 1GB. If the limit has been hit and you can no longer upload local files as custom apps, you can remove older custom apps to make space.

Reports
TechSuite reports are generated automatically after a Tool or Procedure has finished running; after-which the report is backed-up on your TechSuite dashboard for further editing or referencing later. Within each report is a wealth of information about the machine, it’s state, and the actions performed on it. See details below.
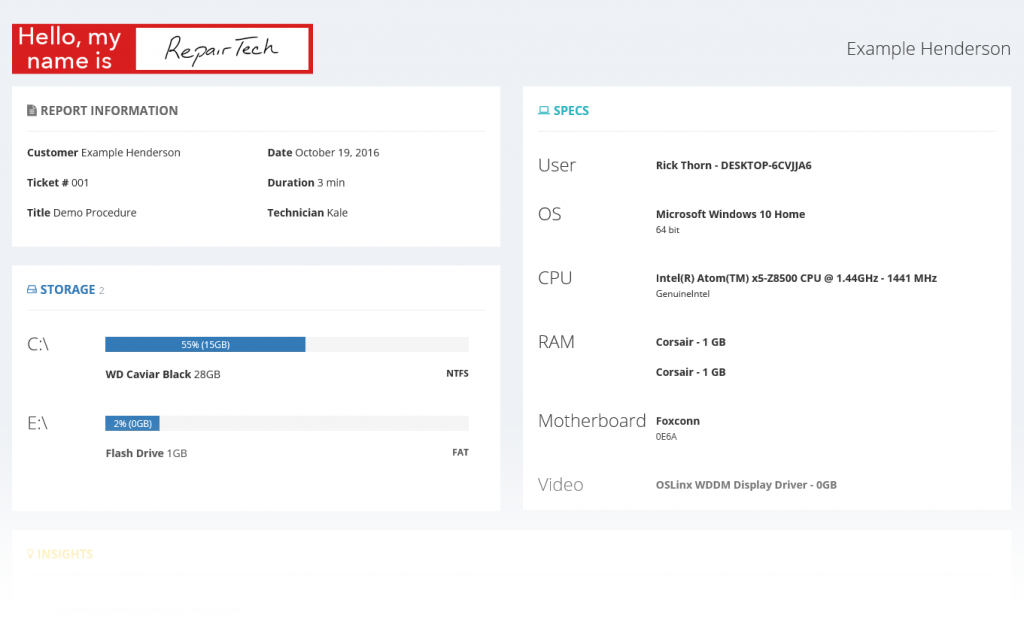
Report Information
Report information will contain basic information about the technician who performed the repair, the ticket number, customer’s name, the date and duration, and finally the title. The title of the report is by default the Procedure that was run. Each of these fields can be customized on the Dashboard.
Storage
Storage will show each drive connected to the computer along with their % usage, capacity, and format. The usage bar will be blue until 85% where it will turn to red.
Specs
Specs is meant to give a high level understanding of the internals of the current device. In Specs, you will find Information about the current user and the name of the device along with the information about the Operating System, CPU, RAM, Motherboard, and Video card.
Procedure Summary
Procedure summary works to help techs understand the impact of their work at a high level. Currently, Procedure Summary will look through every application and report back the storage space recovered, the applications installed/updated/uninstalled and total number of malware threats removed.
Insights
Insights is an entirely new and simple way to check for common issues on a machine. If an of the issues below are found, they will be shown to you in the report for that device.
- Low Drive Capacity
- Drive Failed SMART Test
- No Antivirus Detected
- Recent Application Crashes
- Recent Blue Screen
- Firewall Disabled
- Device Issues Detected
Don’t see something that we should be checking for? Let us know!
Tool Summaries
Tools can produce logs that are thousands of lines long. To cut down on reading time, we’ve build special parsing for each tool in TechSuite to extract the most useful information and highlight it. You can view the full output, by clicking on the down-arrow to the right of the report.
Offline Mode
 If you’re going to be operating in offline mode, TechSuite can help you prepare for that case. First, note the Online/Offline Indicator in the bottom-left corner of the app. If that is Online, you may download all the TechSuite applications ahead of time, allowing them to be run on machines where networking isn’t functional. To do so, click the Online button. This will navigate you to the Offline Settings Page.
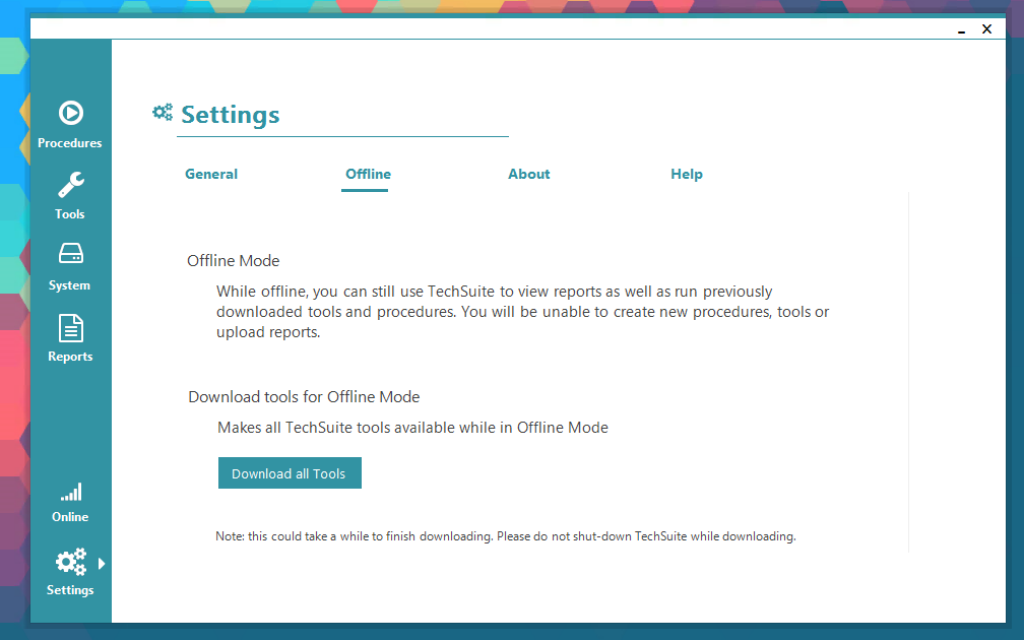
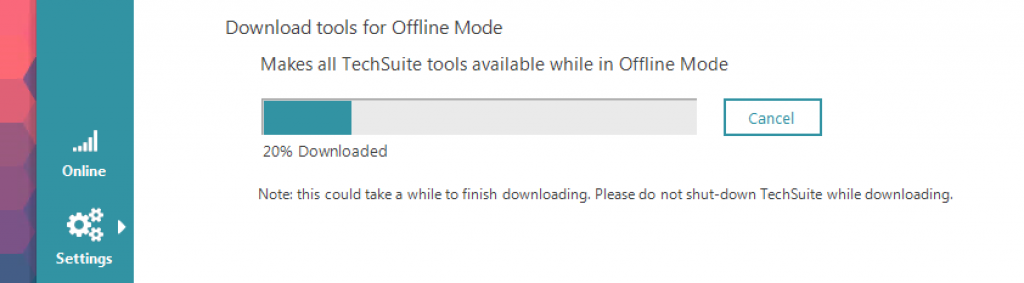
From here, you can click “Download all Tools”. Note this process can take some time. Once done, transfer TechSuite and it’s TechSuite folder to the computer you wish to perform work on. On boot, you should see all the available tools in TechSuite.
Some other actions are not available while offline
While offline, there are a few other actions that cannot be performed due to the lack of connectivity. A tech will not be able to make any edits to existing, or create new Procedures and Custom Applications. Additionally, Reports will not be uploaded but can be re-attempted once network access is regained by restarting TechSuite.
Run TechSuite from Command Line
Command Line Parameters
TechSuite has the capability to be run from command line allowing for silent runs and scheduled runs. To do this, head to the Downloads page on your Dashboard and click “Download TechSuite Console”. To run the application, open up CMD Prompt, navigate to the directory where techsuite_console.exe is located and run it.
Commands
 --account | -a
 --version | -v
 --procedures | -p
 --tools | -t
 --update | -u
 --procedure-info [procedure name] | -k
 --tool-info [toolname] | -i
 --download --procedure [procedure1 procedure2... ] | -d --procedure
 --download --tool [tool1 tool2... ] | -d --tool
 --run --procedure [procedure1 procedure2... ] | -r --procedure
 --run --tool [tool1 tool2.. ] | -r --tool
 --resume-run | -i
 --set-password [new password] | -s
 --remove-password | -q
Example
TechSuite_console.exe -r --procedure "Cleanup" "Malware removal" "Update Apps" -e [yourpassword]
 > Run the Procedures "Cleanup", "Malware Removal", and "Update Apps" while requiring a password
Example
TechSuite_console.exe -r --procedure Malware -e [yourpassword]
> Runs Malware Procedure
Options

 --customer [customer]
 --ticket [ticket]
 --password [password] | -e
 --offline | -o
 --help | -h
Example
TechSuite_console.exe -r --procedure Malware -e [yourpassword]
 > Runs Malware Procedure
Use Cases
The most effective way to use command line functionality is through a RMM or some other tool to remotely access and control a device. By leaving TechSuite on a computer (preferably in a location where consumers cannot easily access it), TechSuite can be setup to run as a scheduled task. For example, once a week, a device could have the RepairTech Cleanup procedure run on it to keep the machine clear of clutter. Here’s how to do just that:
- Open up Task Scheduler and Create a “Basic Task”
- Set the frequency to Weekly and choose a date and time where the computer will be On but not needed for heavy usage
- Specify the path for techsuite_console.exe (we recommend somewhere above the User Folder)
- Append the file path with “-r –procedure Cleanup“
- Bonus: We recommend applying a password using the -s syntax ahead of time. If there is a password, append “-e [your-password]“
Applying/Editing a password
Applying a password is simple. Use the command: techsuite_console.exe -s [yourpassword]To remove a password, you’ll need to enter the existing password: techsuite_console.exe -e [yourpassword] -q
Tools
We’ve added quite a few tools in the past several months. If we should add any more, please let us know at support@repairtechsolutions.com.
76 Tools available in TechSuite as of version 1.0.4:
Check Battery Health
Check Device Manager
Check for App Crashes
Check for Blue Screens
Clean Firefox
Clean Flash
Clean Google Chrome
Clean Internet Explorer
Clean System
Clean System (Deep Scan)
Clean Windows Explorer
Clean Windows Update Cache
Create Restore Point
Defragment Drives
Diagnose Printer Issues
Emsisoft Anti-Malware
Enable Custom DNS
Fix Filesystem Issues
Flush DNS Resolver Cache
Get Product Keys
HijackThis
Install .NET 4.5
Install 7-Zip
Install AdBlock Plus for Chrome
Install AdBlock Plus for IE
Install Adobe AIR
Install Adobe Shockwave Player
Install CCleaner
Install Dropbox
Install Firefox
Install Google Chrome
Install Google Chrome 13
Install Java Runtime 8
Install JDK 8
Install K-Lite Codec Pack
Install KeePass Password Safe
Install LastPass
Install Notepad++
Install OpenOffice
Install Reason Core Security
Install Silverlight
Install Skype
Install Steam
Install Thunderbird
Install VLC
Install Web of Trust for IE
Install Windows Updates
Install WinRAR
Kaspersky TDSSKiller
List Installed Apps
List Installed Drivers
List Startup Applications
McAfee Stinger
ProcessHawk
Reason Core Security
Recover Browser Passwords
Recover Mail Passwords
Recover Outlook PST Password
Registry Investigator
Renew Internet Connections
Repair SSL/HTTPS/Cryptography
Repair Windows Automatic Updates
Repair Winsock (Reset Catalog)
Repair Workgroup Computers View
Reset Internet Protocol
Reset Windows Firewall Configuration
Restart Computer
Restore default HOSTS file
RKill
RogueKiller
Sync System Time
System File Checker
Test HDD for Issues
View HDD SMART Info
View Wireless Keys
Zemana AntiMalware
Custom Branding
TechSuite is completely custom branded with your logo and shop’s information. That information can be modified via your TechSuite Dashboard within Settings: TechSuite Dashboard
Syncing
TechSuite will automatically sync with RepairTech servers and back up your custom apps, presets, and settings changes. When you startup TechSuite somewhere else, your configurations will be available there as well, even if you don’t bring along your Config folder 🙂
Updates to TechSuite
TechSuite automatically checks for and downloads updates from RepairTech servers each time it’s connected to the Internet. You can manually check for updates by clicking “Settings” > “About” > Check for updates. Generally, there are new releases for TechSuite every 3-4 weeks. To see a list of recent updates and announcements, you can go to our release notes.
Troubleshooting
The majority of issues using TechSuite arise from 3 situations.
- .NET version is too low – TechSuite requires a version of .NET 4.5 or higher. Typically Windows 7 SP3 machines or newer will have this.
- An Antivirus/Antimalware application is blocking TechSuite – Often times, AV/AM apps detect each other and attempt to quarantine that false positive. TechSuite is no different so when working on a machine, temporarily disable your AV/AM app until the repair is complete.
- The network has been configured with a proxy – TechSuite does not yet support certain proxy configurations and will not be able to communicate with our servers. This will severely limit TechSuite’s functionality.
Have covered your bases against these three cases? If so, please contact support@repairtechsolutions.com for help 🙂